SSO React Native

This how-to guide explains how to implement ZKsync Smart Sign On in a React Native application using passkeys.
What you'll learn:
- How to set up ZKsync SSO in a React Native app.
- How to authenticate transactions with Face ID.
Tools:
- - zksync-sso-react-native
- - zksync-ethers
- - react-native
- - expo
Prerequisites
- An Apple developer account.
- A registered domain to associate passkeys with.
- You have installed all of the system dependencies for React Native, including Node, Watchman, the React Native command line interface, a Ruby version manager, Xcode, and CocoaPods. To set these up, follow the steps on the React Native environment setup page. Under "Target OS" select "iOS".
- An iPhone with Developer Mode enabled and that is added to your Apple Developer account.
- A wallet with ZKsync Era Sepolia Testnet ETH. If you need testnet ETH, use one of the ZKsync Era Sepolia faucets.
What we are building
In this tutorial we will build an iOS payment app similar to Venmo. You will be able to:
- Create a new embedded wallet using ZKsync SSO.
- Send ETH to other wallets.
- Sign transactions with Face ID.
- See recent transactions from your friends list.
The app does not have any backend or storage implemented. The friends list is hardcoded, and the transactions list only shows real-time transactions while the app is running, as they are not stored anywhere.
Setup
To get setup, first clone the template project:
git clone https://github.com/sarahschwartz/sso-react-native-demo.git
Then, move into the project folder and install the dependencies:
cd sso-react-native-demo
npm install
Signing
Open the workspace at ios/ZKsyncSSOPay.xcworkspace in Xcode.
Select the project target in the left-side menu.
Under "Signing and Capabilities",
add your team, create a unique bundle identifier based on your domain,
and select "Automatically Manage Signing".
Make a new App ID on your Apple Developer account using the unique bundle identifier you created. Make sure to select Associated Domains while creating the App ID. This is required to use passkeys.
Associated Domain
Add your App ID to a site association file, and deploy the file to your domain. You can find an example of this file in the zksync-sso repo.
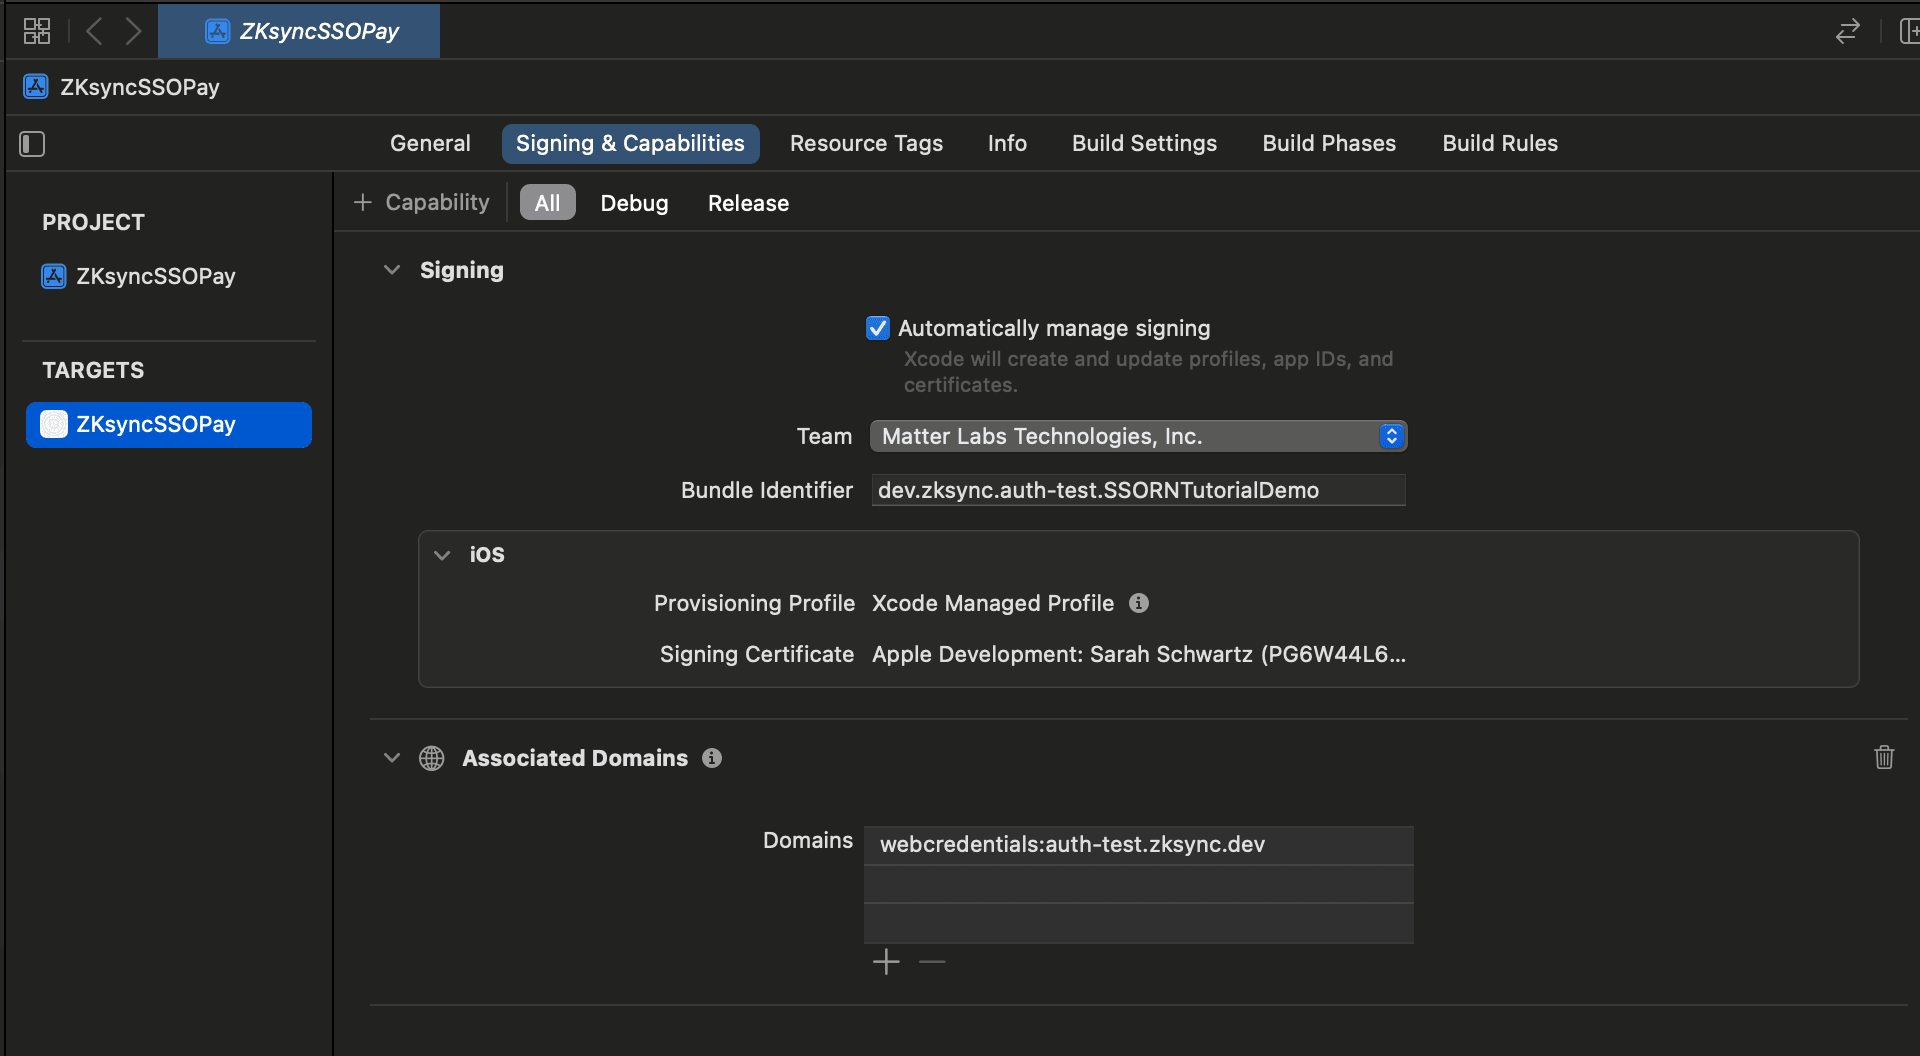
In Xcode under "Signing and Capabilities",
click on "+ Capability" and add "Associated Domains".
and add your domain (e.g. webcredentials:auth-test.zksync.dev).
At this point, your domain points to your App ID, the App ID points to your domain. Your "Signing and Capabilities" tab should look like this, but with your team, bundle identifier, and domain:
Understanding the app
Most of the app is already setup for you, minus the ZKsync SSO integration. Before we start the integration, let's go through some of the existing components to understand how the app works.
Contexts
There are two context providers used in the app: AccountContext and TxnContext.
AccountContext
The AccountContext.ts file manages the account details for the user via a context provider.
It lets us access the user's account details in other components.
The AccountProvider is used in the app/_layout.tsx file to wrap our entire application,
so the account details are always available.
TxnContext
The TxnContext.ts file looks for recent transactions from the user's account
and the accounts of their friends.
It uses a ZKsync provider to watch all of the blocks produced on ZKsync Era Sepolia testnet and filters the transactions
based on the friend accounts in the utils/mockData.ts file.
The TxnProvider is used in the app/(account)/_layout.tsx file,
so the transactions only become available once the user is signed in.
app/index.tsx
Our index page is the entry file for our app.
It just shows the MainView component.
Right now the MainView component is missing a prop: the RpId.
We will add this in the next section.
MainView component
The MainView.tsx component manages whether to show the user the LoggedOutView component or redirect them to the tabs in app/(account)/(tabs).
It uses the account context to get and set the user's account details.
Right now this component is missing the values for the accountName and accountUserID props to pass into the LoggedOutView component.
We will add these in the next section.
LoggedOutView component
This component gives the user the option to either create a new account and passkey, or sign-in with an existing account and passkey.
If the user tries to sign-in,
the handleSignIn function is called.
This function uses the getAccountByUserIdWrapper function and the account's user ID prop to find the user's deployed account
and construct the account details object.
The next section will explain more about how this works.
If the user chooses the create a new account,
a modal will show with the AccountCreationView component.
AccountCreationView and PasskeyCreationView components
The AccountCreationView component is mostly a view wrapper around the PasskeyCreationView component.
It displays the user name and user ID used for account creation.
The PasskeyCreationView component is where the createPasskey function is called.
We will add this function in the next section.
Account Tabs
In the app/(account)/(tabs) folder there are three tabs:
index.tsx: shows recent transactions from the transaction context.friends.tsx: shows a list of friends.wallet.tsx: shows the user's wallet address and balance.
The friend items on the friends page and the "Send" button on the wallet page both link to the send-money/[id].tsx view.
send-money/[id].tsx
The send-money/[id].tsx view lets users transfer ETH based on the input dollar amount.
The amount of ETH is calculated based on the latest price of ETH that is fetched from Alchemy in the utils/prices.ts file.
When a user tries to send ETH,
the sendETH function is called,
which then calls the sendETHWithSSO function that we will implement in the next section.
Now that you have a high-level understanding of the main pages and components of the app,
let's add the react-native-zksync-sso SDK and implement our missing functions and data.